Jazz isolations let you move your ribcage, hips, shoulders or head with a clear rhythmic choice while the rest of your body stays relatively settled. Start with a small side shift or turn, return to centre, and keep breathing. You don’t need to make the movement large for it to read.
An adult beginner often moves everything at once when a teacher calls for an isolation. The fix is to give each area its own slow task before adding music or steps. This guide gives you four starting movements, a short practice set and checks for the compensations that make them feel harder than they are.
Quick answer: Warm up, stand or sit with steady support, and move a single area through a comfortable range. Shift the ribs without dragging the hips, shift the pelvis without turning the knees, lift a shoulder without leaning, and turn the head gently without throwing it back. Pause at centre between attempts.
What is a jazz isolation?
An isolation asks you to direct attention and movement to a chosen body area. It doesn’t mean freezing every other joint. Your feet, breath and supporting muscles still respond enough to keep you balanced. The visible result is a clearer accent: the ribs travel while the pelvis stays near its starting place, for example.
Ailey Extension’s jazz class description places isolations in the warm-up and connects them to musicality and precision. Jazz dance also has Black American social and performance roots; dance scholar Melanie George’s essay for Jacob’s Pillow explains the form’s relationship with jazz music and swing. A slow studio drill helps you organise the body, but the movement gains its character when you let it answer the music.
Teachers don’t all sequence isolations the same way. Jazz artist Danny Buraczeski describes working through head, shoulders, ribs and hips while shifting weight. This guide starts with the feet still so a new dancer can feel each area; take your teacher’s version into class once that separation feels clear. If you’re choosing a class, our jazz dance introduction explains how studio, theatre and vernacular approaches differ.
Set up before you move
Give yourself a few minutes of easy walking or another comfortable whole-body movement before the drill. The International Association for Dance Medicine & Science’s 2025 warm-up paper recommends gradually raising the pulse, then adding joint mobility and dance-specific movement. Cold, abrupt accents aren’t the starting point here.
- Standing: Place your feet about hip-width apart on a clear, stable floor. Let your knees bend easily and feel weight under both feet.
- Seated: Sit where your feet can rest on the floor or a firm support. Keep enough room beside your arms to move without hitting furniture.
- Range: Start with a few centimetres of travel or a small turn. Breathe through each effort and return to a comfortable centre.
Use a mirror if it helps, but don’t make a big shape to prove that you moved. The first check is sensory: can you name what travelled and what stayed relatively steady? A teacher can help adjust the drill for your body, especially if a previous injury, balance change or limited range affects the setup.
The drawings show the four small directions below. Their dashed outlines mark the start, coloured areas mark the moving part, and arrows show direction. The words in each section give the same instructions without the drawings.
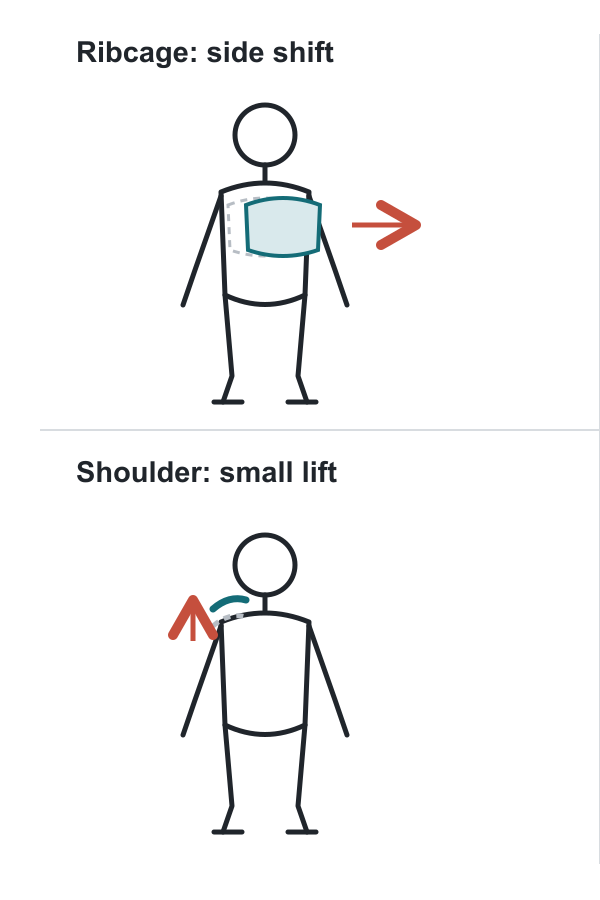
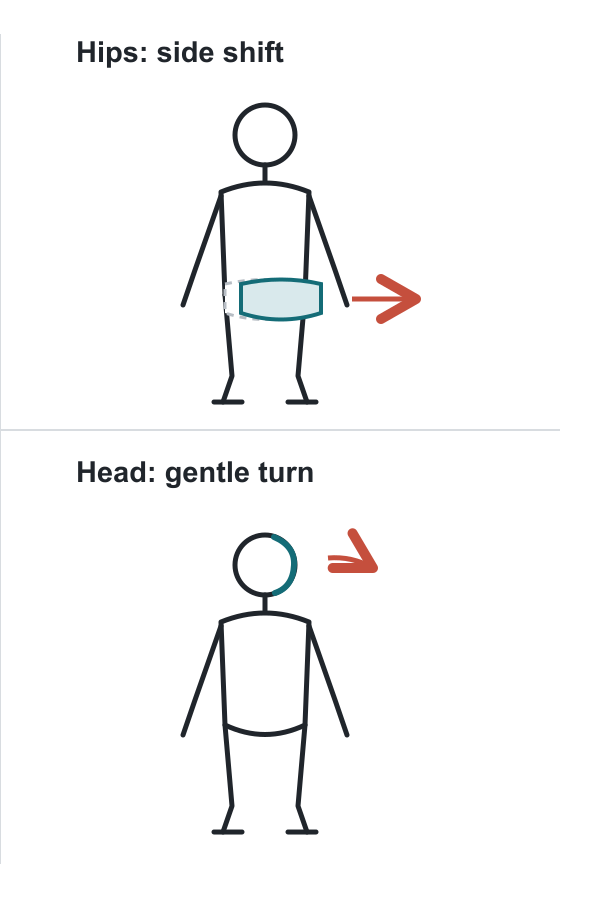
Start with a short path in each area, then return to centre before changing direction. Open either drawing for a larger view.
Ribcage: shift sideways without leaning
Place your hands lightly on the lower sides of your ribs. Keep both feet weighted and your pelvis near the middle. Slide your ribcage a small distance to the right, return to centre, then go left. Let the head travel with the torso instead of tipping it toward a shoulder. Breathe rather than holding the ribs rigid.
Watch for a whole-body lean. If your right foot becomes much heavier and your left hip follows the ribs, cut the travel in half. Try the move slowly with a hand near, rather than pressing against, the side of a wall. The wall can show when the ribcage has moved; it shouldn’t push you back.
Try four cycles without music. Then let a single shift answer a drum or piano accent while the next beat stays plain. That contrast makes the action readable without forcing more range.
Hips: move the pelvis without twisting the knees
Rest your hands on the sides of your pelvis. Keep the ribs near centre and slide the pelvis a small distance right, centre, then left. Your knees can soften, but let them continue facing broadly in the same direction as your feet. Don’t torque them to create a bigger hip shape.
Notice whether your shoulders chase the pelvis or your heels lift. If they do, shorten the shift until both feet feel steady. In a seated version, let the pelvis make a tiny weight change against the chair while the upper torso stays calm; a stable chair is support, not a lever to push against.
The Middle Tennessee State University dance handbook includes pelvis, ribcage and shoulder-girdle isolations alongside weight shifts and alignment in its early jazz technique goals. That pairing is worth remembering: when you later walk, an isolation still needs a clear supporting foot.
Shoulders: lift and release without bracing the neck
Let both arms hang comfortably. Lift your right shoulder a little toward your ear, lower it, then try the left. Keep the ribs quiet enough that the shoulder action stays distinct. Don’t clamp the shoulder down at the end; allow it to settle.
If your head tips toward the lifting shoulder, reduce the lift and imagine a little room between your ear and the opposite shoulder. If the jaw or neck tightens, pause and reset. Alternate the sides slowly before trying a quicker musical accent.
Head: turn gently instead of rolling the neck
Keep the ribs and shoulders near centre. Turn your head a small amount to look right, return your gaze forward, then look left. Move slowly enough that you can stop at any point. You don’t need a full neck circle or a fast head toss to practise a head isolation.
Frimley Health NHS Foundation Trust’s neck guidance recommends gentle, slow turns without pushing to the maximum range and says to stop if pain or dizziness appears. Keep this drill within that limit. If neck symptoms persist, recur or appear outside dancing, ask a qualified clinician before continuing.
Add rhythm without losing the movement
Start with an even pulse you can hear. Take two beats for a small shift and two beats to return; repeat on the other side. Those counts are a practice choice, not a rule for jazz choreography. Once the pathway stays clear, put a short accent on a sound you choose and leave a beat empty. You can also keep a soft walking pulse beneath an upper-body isolation when your teacher says the stationary version is secure.
The D-VOC isolation video collection shows separate short examples for head, shoulders, ribs and hips. Watch one area at a time: note what moves, what stays steady and where the dancer returns to centre. Some clips show larger ranges than this beginner drill. Keep the version that fits your body and ask your teacher before copying a fast or deep movement. Our dance-video study guide gives a fuller order for reading weight and timing from a clip.
A short daily isolation practice
Set aside about six minutes on a clear floor, or use the seated setup. Work slowly enough that every return to centre feels deliberate. Stop early if the movement becomes strained.
- Warm up for two minutes: Walk easily or move through a comfortable seated pulse, then let the shoulders and torso mobilise gently.
- Ribs for one minute: Shift right, centre, left, centre. Make the path smaller if the whole torso leans.
- Hips for one minute: Shift the pelvis right and left while the knees keep following the feet.
- Shoulders and head for one minute: Lift and lower each shoulder, then turn the head gently to either side. Leave out the head drill if it doesn’t feel comfortable.
- Music for one minute: Choose a single area. Mark a small accent, return to centre, and leave the next beat free.
This drill fits the isolation focus in week two of our eight-week adult beginner jazz plan. If six minutes is too long today, shorten each section. The goal is control and an easy reset, not a larger range by the end of the session.
Common compensations and what to change
Use this check after a slow round, not while trying to keep up with a class combination. A mirror or a teacher can show movement you can’t yet feel.
| What you notice | What may be happening | Next attempt |
|---|---|---|
| The whole body tips during a rib shift | The path exceeds your current control | Keep weight under both feet and halve the travel |
| The knees twist during a hip shift | The feet stay fixed while the legs try to make the shape | Reduce the range and let knees face with the feet |
| The neck tightens during a shoulder lift | The shoulder and jaw brace together | Lower the effort and pause between sides |
| The head moves faster than you can stop it | Momentum replaces a controlled turn | Return to a small, slow gaze change or skip the head drill |
If a compensation keeps returning, ask your teacher to watch a single repetition and name where it starts. Our dance plateau guide shows how to test a single correction instead of adding more movement.
When to change or stop the drill
Keep the movement small and comfortable. Stop if you feel pain, numbness, unusual dizziness or a loss of control. Don’t push through symptoms to finish the minute. Tell your teacher what happened, and seek qualified clinical advice if a symptom persists, returns or affects you away from class.
If standing balance is the problem, keep the upper-body work seated or use a stable support after your teacher helps you set it up. If a class combines fast travel with head movement before you can control the slow version, mark the upper-body action small and ask for a progression. A written drill can’t replace a teacher’s assessment.
Take the isolation back into class
Choose the area your next class uses most and practise its short path before class. When your teacher adds a step, find the supporting foot first, then let the isolation answer the music. If you can’t return to centre without a catch step or strain, keep the feet still and ask the teacher for a smaller version. Clear timing and an easy reset will serve you better than a dramatic shape you can’t control.